I recently posted a new tutorial in my Etsy Store: The Diamond Rio Tila Bracelet. This bracelet would look good created in any colorway, however, I chose a very neutral color scheme for demonstration purposes. A brief description; A 14mm rivoli bezeled with Delica's encased with a tila bead and crystal frame and attached to square stitched bands that have embedded tila beads in diamond shapes in them.
The ends of the bands are embellished with herringbone faux cuffs. This tutorial incorporates several stitches; herringbone, peyote, right angle weave, square stitch and picots. One should be familiar with these stitches before attempting this tutorial. Skill Level: Intermediate. The tutorial includes several illustrations and step by step instructions. This tutorial is in PDF format and is listed in my Etsy store, Lady Abeada for $8.50. You may also purchase it here by using the paypal button located in this post.
Until next time..... Bead True to Yourself!
Friday, August 24, 2012
Thursday, August 23, 2012
What I have been working on....
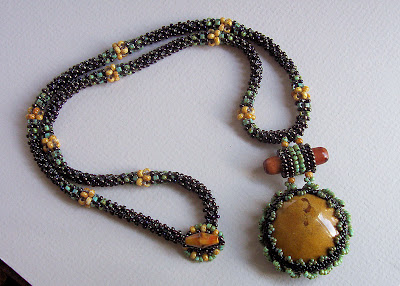
I have had this ceramic cabochon with this cool little question mark on it for about a year now. I bezel-ed it with a metallic iris brown delica and for some reason wasn't really happy with how it looked-- So, I stuck it in my UFO box to come back to some other time and haven't thought about it again; until the other day.
This entire project turned into one big experiment for me. I knew that I wanted to do a CRAW rope but I didn't want it to be plain looking-- so I began playing with different types, sizes and colors of beads. I experimented with 1.5 cubes and 3 different sizes of seed beads. The final combination had a graduated affect and made for interesting little intersections in the rope to catch the eye.
From there I moved on to the cabochon. My original bezeling was plain looking and boring to me. What to do to make it interesting and get the ? mark to pop a bit? I used size 15's to do a picot that pointed inward and size 11 picasso cornflower on the outer edge. Much better and not so plain looking. Then I wanted to come up with a novel way to create the bail and attach the cabochon to the rope. I used a wooden bead and square stitched the bail around it and used other beads as buffers to attach each piece to the bail. I finished it off with a peyote loop and used another similar colored bead as a toggle. All in all I'm pretty pleased with how it turned out and its one less project cluttering up my UFO box!
Until next time...Bead True to Yourself!
Saturday, August 11, 2012
CRAW... an interesting stitch!
Greetings my beady friends! Has anyone melted in the summer heat yet? I thought we'd talk a little about cubic right angle weave today. It's an addicting stitch and quickly becoming one of my favorites. A while back I created a brick stitch pendant with a CRAW rope to sell in my Etsy store and one of my customers saw it and requested me to make them a tutorial for the rope. Writing the text was a snap... however, not so much with the illustrations and graphics. :( Anyone that has worked with a graphics program and tried to create three dimensional illustrations can totally relate to what I am saying. Not an easy feat by any means. Anyhoooos...the thing I love about CRAW is that it can be used to create varying shapes and by changing up bead sizes and types you can really come up with some interesting combinations. Don't even get me started talking about the many different ways that one could embellish a rope. CRAW is definitely a stitch staple to know when it comes to bead architecture. If you haven't experimented with it yet, you definitely should put it on your to do list! Below is a photo of my CRAW rope tutorial.
If you are interested in the tutorial for the CRAW rope, the purchase price is $10.00 and you may purchase by clicking on the "Pay Now" button in this post. Thank you!
Until next time..... Bead True to Yourself!
Subscribe to:
Comments (Atom)


